|
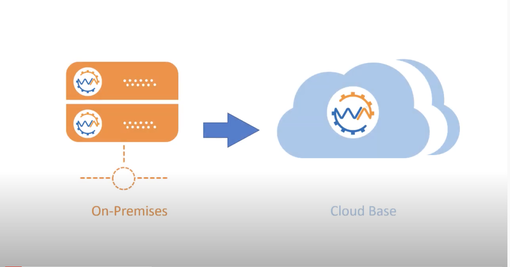
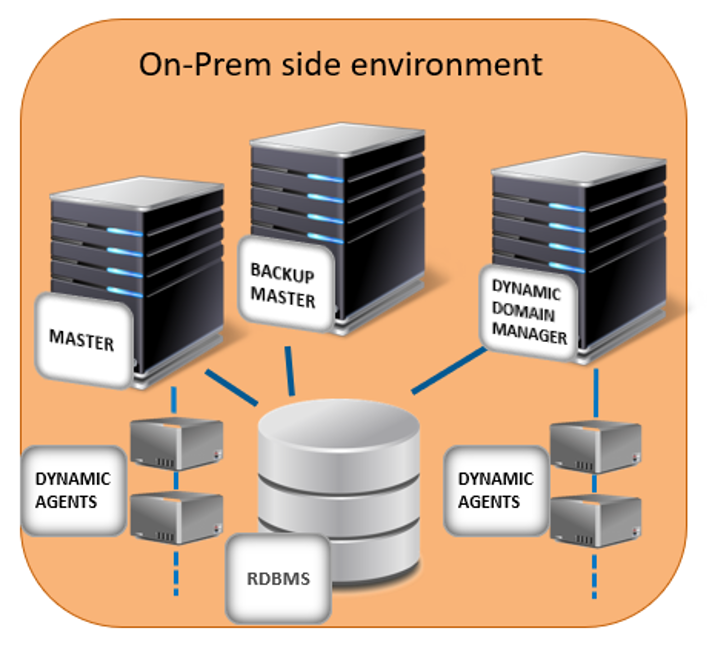
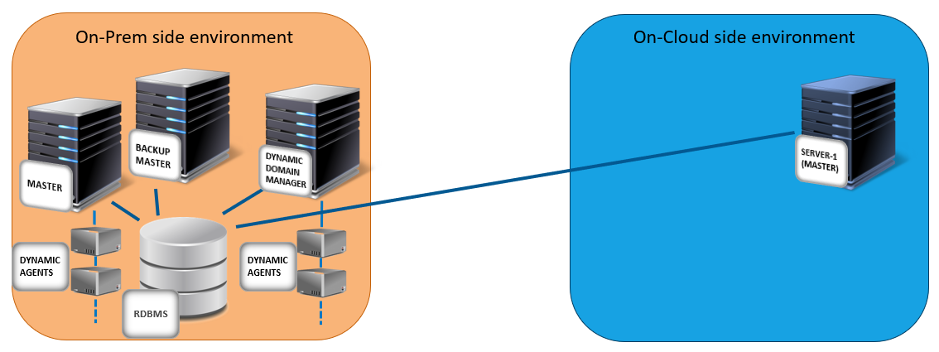
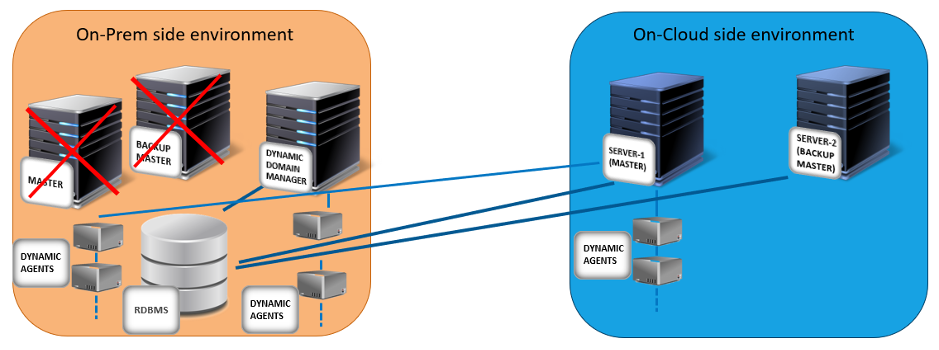
To improve productivity and to save IT management costs and time, our customers are starting to move to the cloud environment and are moving heavy workloads from a set of on-premises machines to a resilient cloud infrastructure. So, our principal mission is to facilitate, secure, and support moving a workload automation deployment, from an on-premises infrastructure (minimum WA 95 FP3 version required) to any cloud infrastructure where Workload Automation (WA) is already supported. Link for the Video guide: https://youtu.be/7AQHgCnpqLc What does moving to the cloud mean? It means that we can install the same types of agents that we have now, live in the on-premises environment, also in the cloud environment, and migrate the scheduling to these new agents. In this way, we can have a brand-new environment in the cloud to leverage all known cloud benefits. We support moving both the master domain manager and its backups, all the dynamic agents linked to the master domain manager brokers, but we cannot support moving fault-tolerant agents and dynamic domain managers to the cloud. They must continue to live in the on-premises environment. The on-cloud server can easily manage the on–premises fault-tolerant agents and dynamic domain managers by leveraging the full SSL connection enablement in the Workload Automation (WA) topology network. In our example, we can use the AWS EKS (Amazon Web Services Elastic Kubernetes Service) cluster, as the final cloud environment for the migration. We created a procedure with just a few simple steps to guide you through the process of moving to the cloud. Let’s go through it and discover just how easy it is! How to move to the cloud? We can divide the procedure into the following 3 main steps: Step 1: Configure your existing Workload Automation on-premises environment in SSL full mode As a first step, you must configure your WA environment in FORCE_ENABLED mode, this means that the communication in the WA network starts in FORCE_SSL mode, but goes in clear if the SSL is not possible. What happens if we have already enabled a different OpenSSL mode for the master domain manager? If you already have FORCE SSL mode enabled, you do not have to perform any action, otherwise, if you have only the ENABLED mode, this is not enough, and you must set the FORCED mode. Fig 1. Example of a on-premises environment that you configured with an SSL security connection Step2: Install and configure a server in the cloud environment with the backup master role for the on-premises master domain manager As a second step, you must install a server (server-1) in the AWS EKS cluster as described in http://www.workloadautomation-community.com/blogs/unleash-the-power-of-hcl-workload-automation-in-an-amazon-eks-cluster, that points to the same relational database used for the on-premises environment and then configure it as a backup master for the on-premises environment. Fig 2. Server-1 server deployment on the AWS EKS cluster with backup master role for the on-premises environment Step3: Permanently switch the master domain manager role from the on-premises master domain manager to the server installed in the cloud environment As a third step, you must switch the on-premises master domain manager as a backup for the server-1server installed in the AWS EKS cluster. The server-1 server deployed in the AWS EKS cluster becomes the master domain manager that orchestrates all the daily scheduling and the topology network. In the AWS EKS cluster, add a second server called, server-2, that has the role of backup master for the server-1 master. After a few days, if the daily scheduling continues to work without any problems, you can think to shut down and/or decommission the master and backup master installed on the on-premises side. Fig 3. The server-1 server becomes the master domain manager for the entire WA network Moving to the cloud step by step Now, let’s go deeper into each step to see the full list of the actions to perform! Step 1: Configure your existing Workload Automation on-premises environment in SSL full mode If your environment is not configured in SSL mode, change the workstation definition of the on-premises master by running: where master is the name of the on-premises master domain manager workstation. Edit the master domain manager definition to implement the following configuration: 1. For the secureaddr parameter, define the port used to listen for incoming SSL connections, for example, 31113 or another available port. 2. For the securitylevel parameter, specify enabled to set the master domain manager to use SSL authentication only if its domain manager workstation or another fault-tolerant agent below it in the domain hierarchy requires it. CPUNAME MASTER DESCRIPTION "MANAGER CPU" OS UNIX NODE your_IP_address TCPADDR 31111 SECUREADDR 31113 DOMAIN MASTERDM FOR MAESTRO TYPE MANAGER AUTOLINK ON BEHINDFIREWALL OFF SECURITYLEVEL ENABLED FULLSTATUS ON END Modify the localopts file located in the TWS_data_dir to enable SSL communication, as follows: nm SSL full port =0 nm SSL port =31113 SSL key ="/install_dir/ssl/OpenSSL/TWSClient.key" SSL certificate ="/install_dir/ssl/OpenSSL/TWSClient.cer" SSL key pwd ="/install_dir/ssl/OpenSSL/password.sth" SSL CA certificate ="/install_dir/ssl/OpenSSL/TWSTrustCertificates.cer" SSL random seed ="/install_dir/ssl/OpenSSL/TWS.rnd" Where the nm SSL port is the same port assigned to the secureaddr parameter defined above and the install_dir represents the directory where the WA master domain manager is installed. NOTE: If you have a dynamic domain manager in your environment, repeat the previous steps on the dynamic domain manager side to have the dynamic domain manager function correctly with the on-cloud master domain manager. The dynamic domain manager will remain in the on-premises environment. The last thing to do in your on-premises environment is restart the Workload Automation processes to apply the changes. Step 2: Install and configure a server in the cloud environment with the backup master role for the on- premises master domain manager You can now start configuring the cloud environment, but first you need to download the latest version of the product depending on the platform you want to use:
helm install -f values.yaml workload_automation_release_name workload/hcl-workload-automation-prod -n workload_automation_namespace where: workload_automation_release_name is the name of the release, for example hwa When you deploy the server as backup master domain manager on the cloud, it is automatically configured in full SSL mode with the on-premises master domain manager. Step 3: Permanently switch the master domain manager role from the on-premises master domain manager to the server installed in the cloud environment Now you can complete the procedure of switching your master domain manager role from the on-premises environment to the cloud environment by following these last few steps. By the end of this process, the scheduling of your environment is completely managed by the server installed on the cloud and you can benefit from all the advantages that this entails. 1. Switch the event processor from the on-premises master to the server (server-1) in the AWS EKS cluster by using the following conman command from the on-premises master or cloud server: switcheventprocessor server1 where server1 is the name of the on-cloud master domain manager workstation. 2. Switch the domain manager capabilities from the on-premises master to the server in the AWS EKS cluster, by running the following conman command from the on-premises master or cloud server: switchmgr domain;server1 where server1 is the name of the on-cloud master domain manager workstation. 3. Assign full control for all objects and folders to the wauser, that is the WA user for the server installed in the cloud. Use the composer command-line command to modify the access control list in the following way: composer mod acl @ ACCESSCONTROLLIST FOR ALLOBJECTS root FULLCONTROL twsuser FULLCONTROL wauser FULLCONTROL END ACCESSCONTROLLIST FOLDER / root FULLCONTROL twsuser FULLCONTROL wauser FULLCONTROL END To make the switch permanent: a. Edit the definition of the on-premises master domain manager using composer and modify the TYPE attribute from MANAGER to FTA. b. Edit the definition of the server installed on the cloud using composer and modify the TYPEattribute from FTA to MANAGER. c. Run the following command for the changes to take effect. JnextPlan -for 0000 d. Edit the FINAL and FINALPOSTREPORT job streams following these steps: composer mod js your_xa#final@ full e. Edit the STREAMLOGON section, changing the previous user to wauser f. Delete the FINAL and FINALPOSTREPORTS job streams from the plan for the on-premises master domain manager, as follows: conman "canc your_xa#FINALPOSTREPORTS" conman "canc your_xa#FINAL" g. Submit first the FINAL, and then the FINALPOSTREPORTS job streams for the on-cloud server into the current plan, as follows: conman sbs your_xa#FINAL conman sbs your_xa#FINALPOSTREPORTS h. Set the value of the limit job stream keyword for the FINAL and FINALPOSTREPORTS job streams for the on-cloud server, both in the database and in the plan, as follows: conman "limit your_xa#FINAL ;10" conman "limit your_xa#FINALPOSTREPORTS ;10" You can optionally decide to deploy a new server with the backup master role in the cloud by performing a scale up of the server component listed in the values.yaml file. To perform this operation, set the waserver.replicaCount parameter to 2. To have more than one server as a backup in the cloud, you can set the waserver.replicaCountparameter to a value greater than 2. After testing this new WA deployment with the master workstation and its backups in the cloud environment, you can now decommission your on-premises master and backup master domain managers. At the end of this scaling up and decommission phase, you have the situation shown in Fig 3. To allow the correct functioning of the on-premises dynamic agents with your master domain manager in the cloud environment, you need to copy the certificates located in the /home/wauser/wadata/ITA/cpa/ita/cert/ directory on the dynamic agents and duplicate them in the /datadir/ITA/cpa/ita/cert directory of the server installed in AWS EKS cluster. You must duplicate the following certificates:
You have now successfully switched your master domain manager to the cloud and set up your on-premises dynamic agents to work in SSL mode with the server instance deployed in the AWS EKS cluster. Are there any further optional steps? Now you can proceed to move the dynamic agent instances into the cloud, by deploying new agents on the AWS EKS cluster and moving the scheduling belonging to the on-premises dynamic agents to them. After moving the scheduling to these new agents, you can decommission the on-premises agents. It’s important to have the dynamic agents in the cloud, because you can scale up and down the number of agent instances based on the scheduling workload and you can also leverage to the Kubernetes job plug-ins, as explained in the following article: http://www.workloadautomation-community.com/blogs/unleash-the-power-of-hcl-workload-automation-in-an-amazon-eks-cluster Otherwise, you can leave your dynamic agents on the on-premises environment. P.S. As a reminder, remember that you cannot move your fault-tolerant agents and dynamic domain manager on–premises instances to the cloud environment!!! Author's BIO
0 Comments
Your comment will be posted after it is approved.
Leave a Reply. |
Archives
July 2024
Categories
All
|


 RSS Feed