|
Can you have your desired number of Workload Automation (WA) agent, server and console instances running whenever and wherever? Yes, you can! Starting from the Workload Automation version 9.5 fix pack 2, you can deploy the server, console and dynamic agent by using Openshift 4.2 or later version platforms. This kind of deployment makes Workload Automation topology implementation 10x faster and 10x more scalable compared to the same deployment in the on-prem classical platform. Workload Automation provides you an effortless way to create, update and maintain both the installed WA operator instance and WA component instances by leveraging also the Operators feature introduced by Red Hat starting from OCP 4.1 version. In this blog, we address the following use cases by using the new deployment method:
Download and Install WA operator and WA components images WA operator and pod instances prerequisites Before starting the WA deployment, ensure your environment meets the required prerequisites. For more information, see https://www.ibm.com/support/knowledgecenter/SSGSPN_9.5.0/com.ibm.tivoli.itws.doc_9.5/README_OpenShift.html Download WA operator and components images Download the Workload Automation Operator and product component images from the appropriate web site. Once deployed, the Operator can be used to install the Workload Automation components and manage the deployment thereafter. The following are the available packages: Flexera (HCL version):
Fixcentral (IBM version)
Each operator package has the following structure (keep it in mind, it can be useful for the steps we are going to see later): The README file in the Operator package has the same content of the url previously provided in the prerequisites section. Once the WA Operator images have been downloaded, you can go further by downloading the Workload automation component images. In this article, we will demonstrate what happens when you download and install the IBM version of the WA operator and how it can be used to deploy the server (master domain manager), console (Dynamical Workload Console), and dynamic agent components. Deploy the WA Global Operator in OCP Now we focus on the creation of the Operator to be used to install the Workload Automation server, console and agent components. NOTE: Before starting the deploy, proceed as follows:
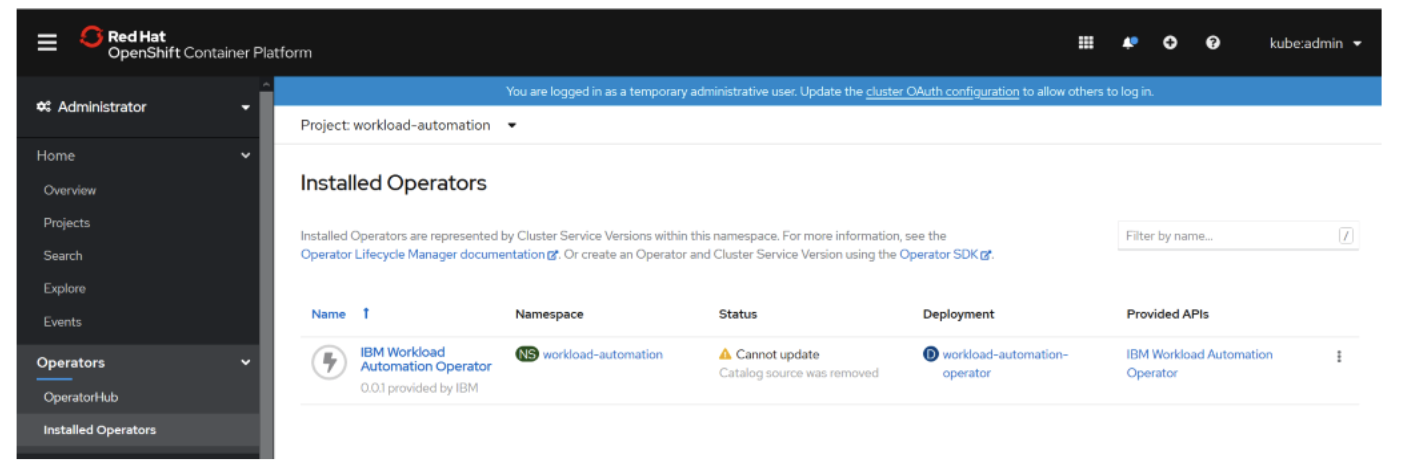
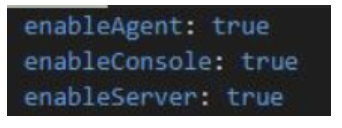
## Building and pushing the Operator images to a private registry reachable by OCP cloud or Internal OCP registry. To generate and publish the Operator images by using the Docker command line, run the following commands: docker build -t <repository_url>/IBM-workload-automation-operator:9.5.0.02 -f build/Dockerfile . docker push <repository_url>/IBM-workload-automation-operator:9.5.0.02 where <repository_url> is your private registry reachable by OCP or Internal OCP registry. Otherwise, if you want to use Podman and Buildah command line, see the related commands to use in the README file. ## Deploying IBM Workload Scheduler Operators by using the OpenShift command line: Before deploying the IBM Workload Scheduler components, you need to perform some configuration steps for the WA_IBM-workload-automation Operator: 1. create workload-automation dedicated project using the OPC command line, as follows: oc new-project workload-automation 2. create the WA_ IBM-workload-automation operator service account: oc create -f deploy/WA_ IBM-workload-automation-operator_service_account.yaml 3. create the WA_ IBM-workload-automation operator role: oc create -f deploy/ WA_ IBM-workload-automation-operator_role.yaml 4. create the WA_ IBM-workload-automation operator role binding: oc create -f deploy/ WA_ IBM-workload-automation-operator_role_binding.yaml 5. create the WA_ IBM-workload-automation operator custom resources definition: oc create -f deploy/crds/ WA_ IBM-workload-automation-operator_custome_resource_definition.yaml ## Installing the operator We do not have the Operator Lifecycle Manager (OLM) installed, so we performed the following steps to install and configure the operator: 1. In the Operator structure that we have shown you before, open the `deploy` folder. 2. Open the ` WA_ IBM-workload-automation_operator.yaml` file in a flat text editor. 3. Replace every occurrence of the `REPLACE_IMAGE` string with the following string: `<repository_url>/<wa-package>-operator:9.5.0.02` where <repository_url> is the repository you can select before to push images. 4. Finally, install the operator, by running the following command: oc create -f deploy_ IBM-workload-automation _operator.yaml Note: If you have the Operator Lifecycle Manager (OLM) installed, see how to configure the Operator in the README file. Now we have the WA operator installed in our OCP 4.4 cloud environment, as you can see in the following picture: Fig 1. OCP dashboard – Installed Operators view ##Deploy the WA server, console and agent components instances in OCP 1. Select the installed WA Operator and go to the YAML section to set the parameter values that you need to install the server, console, and agent instances: 2. Choose the components to be deployed, by setting them on true: 3. 4. In this article, we are going to deploy all components, so we set all values on true.Set the number of pod replicas to be deployed for each component: 5. In this example you leave the default. In this article, we decided to set replicaCount to 2 for each component.
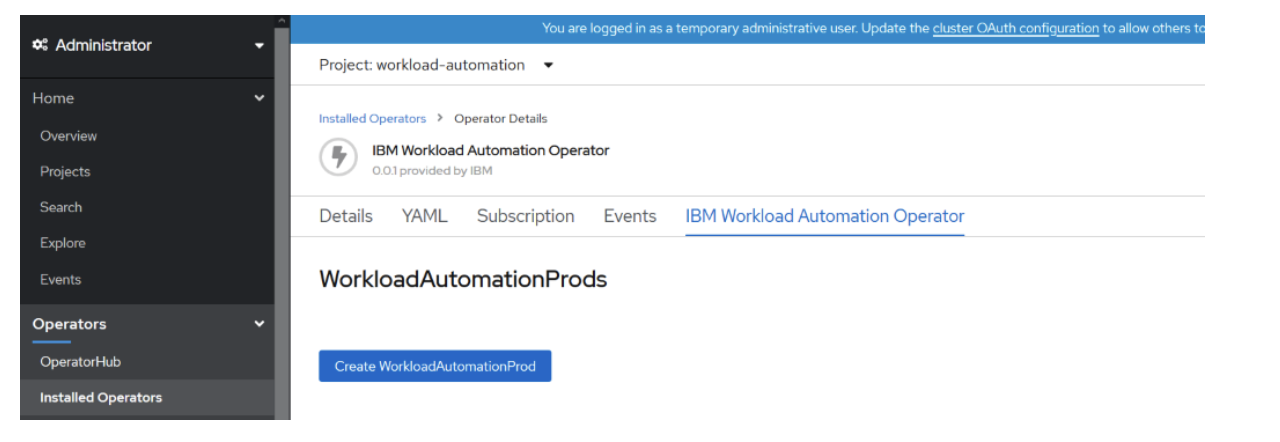
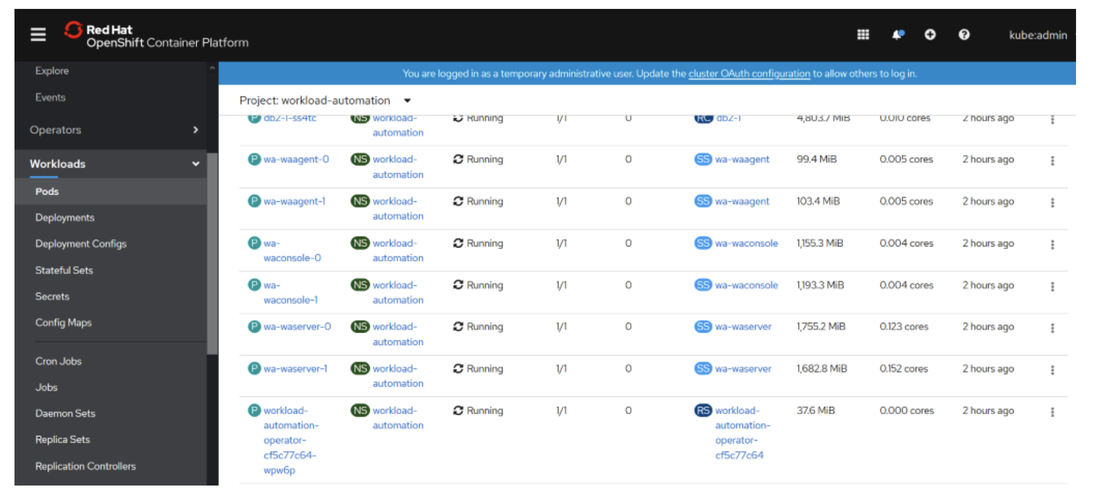
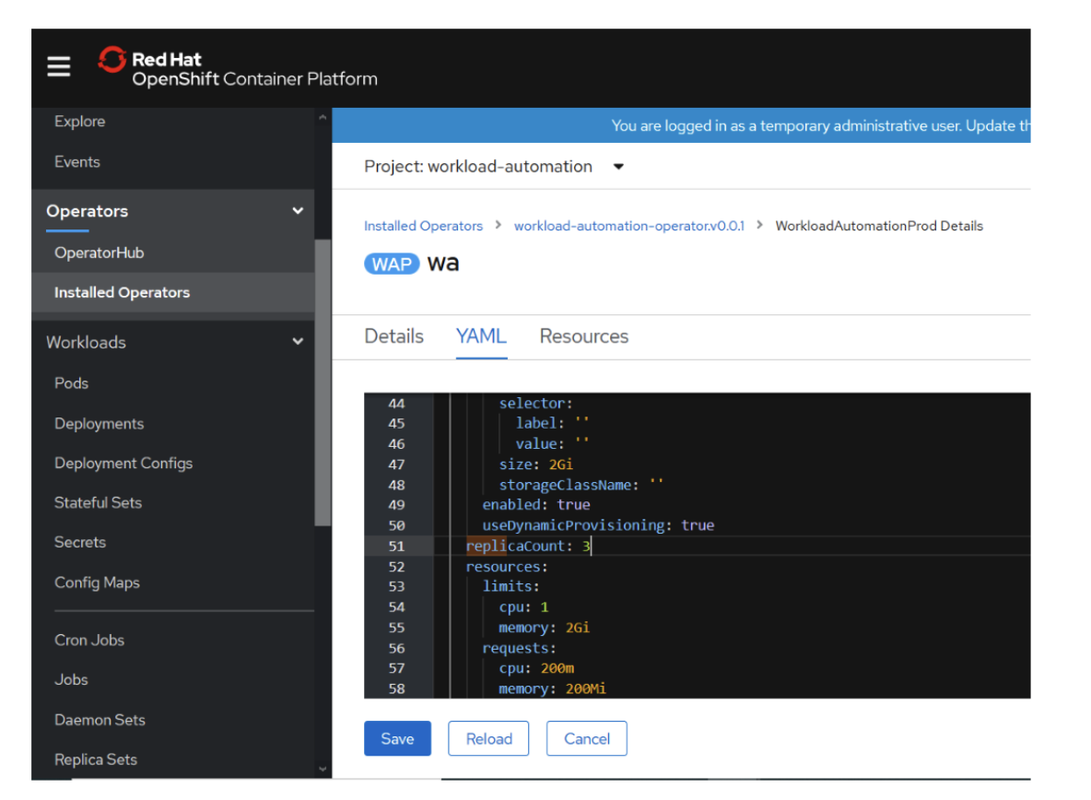
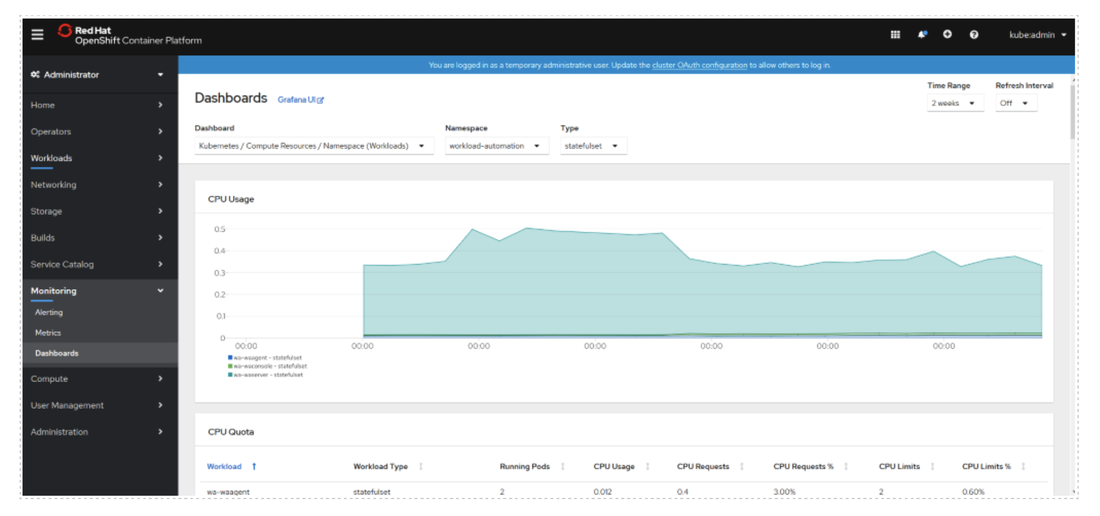
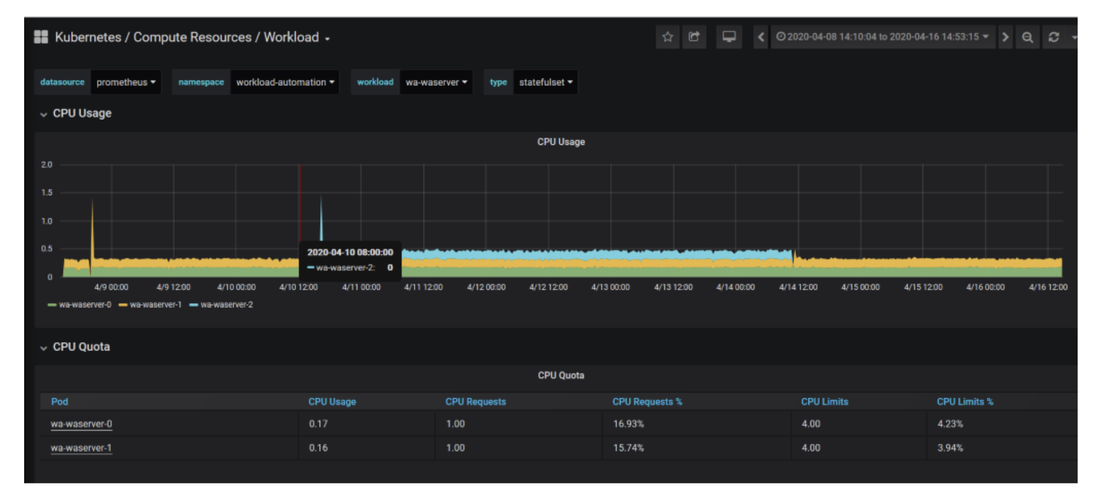
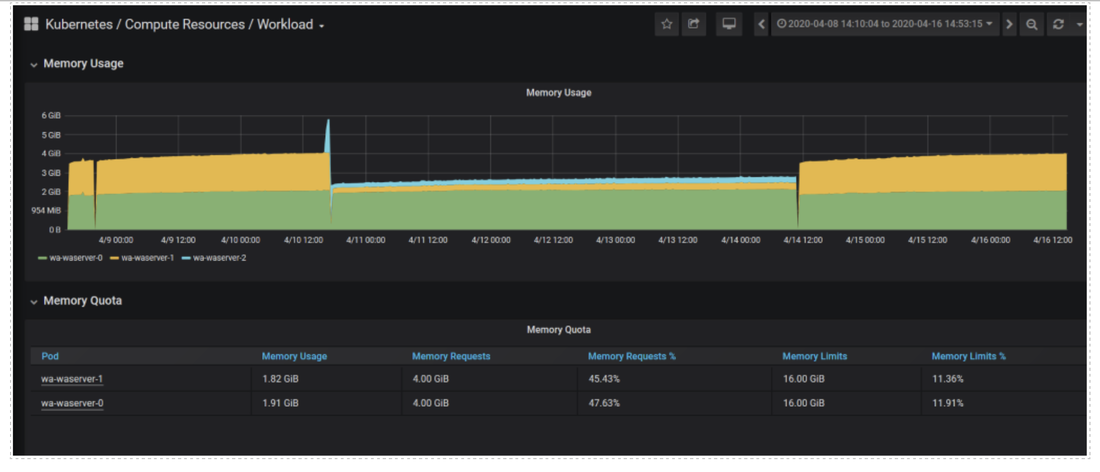
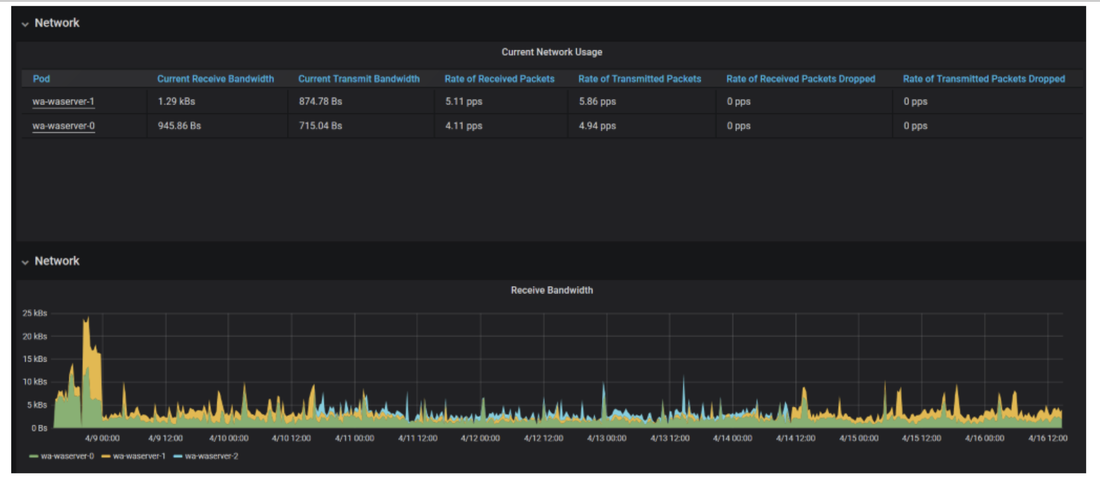
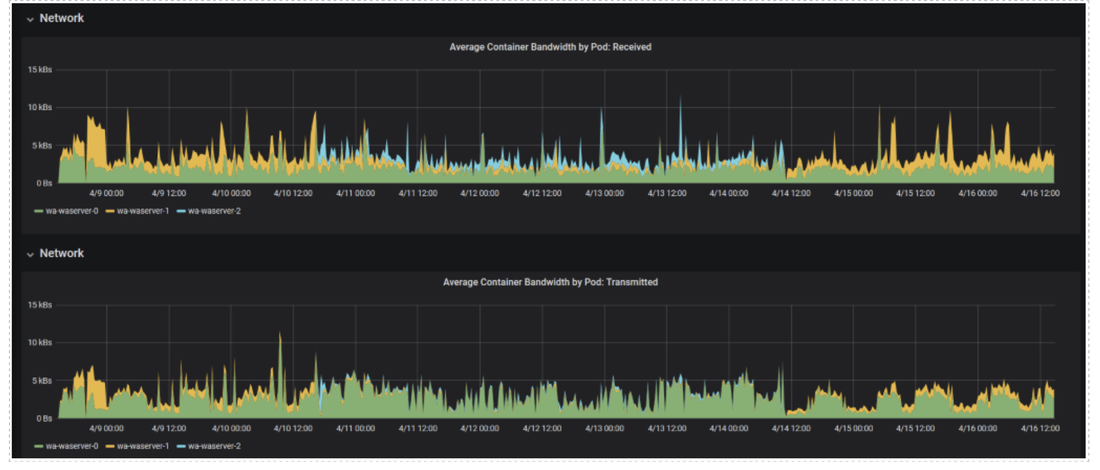
After all changes have been performed, go to the WA Operator section and select “Create WorkloadAutomationProd”, Fig 2. OCP dashboard – Installed Operators - IBM Workload Automation Operator instance view When the action is completed, you can see the number of running WA pods that is the same one selected in the YAML file for server, console and agent components: Fig 3. OCP dashboard –Workload – Running pods for workload-automation project. Scheduling - Scale UP and DOWN instances number Thanks to the Operator feature, you can decide to scale up or down each component just simply going to the installed WA operator, and modifying the “replicaCount” value number in the YAML file related to the instance you previously created. Saving the change performed on the YAML file, the Operator automatically updates the number of instances accordingly to the value you set for each component. In this article we show you how we scaled up the wa-agent instances from 2 to 3, by increasing the replicaCount value, as you can see in the following picture: Fig 4. OCP dashboard – Modify Installed Operators YAML file for workload-automation project. After a simple “Save action”, you can immediately see the updated number of running pod instances, as you can see in the following picture: Fig 5. OCP dashboard –Workload – Pods view for workload-automation-jade project. Note: You can repeat the same scenario for the master domain manager and Dynamic Workload Console. The elastic scheduling makes the deployment implementation 10x faster and 10x more scalable also for the main components. Monitoring WA resources to improve Quality of Service by using OCP dashboard console Last but not least, you can monitor the WA resources by using OCP native dashboard or going in drill-down on the Grafana dashboard. In this way, you can understand the resource usage of each WA component, collect resource usage and performance across WA resources to correlate implication of usage to performance, and scale up or down WA component number to improve overall components throughput and improve Quality of Service (QoS). So, you can understand if the number of WA instances you deployed can support your daily scheduling, otherwise you can increase the instances number. Furthermore, you can understand if you need to adequate the WA console instances number to support the simultaneous multiple users access, that is already empowered by the load balance action provided by OCP cloud. In our example, after having scaled up the replicaCount to 3, we realized that 2 instances were sufficient to have a good performance in our daily scheduling. Thus, we decreased the instance to 2 to not exceed the available resource quotas. The following pictures show you the scaling down from 3 to 2 instances: Fig 6. OCP dashboard (workload automation namespace) The following picture shows a drill-down on the Grafana dashboard of a defined range of time in which we scaled down from 3 to 2 server instances. Fig 7. Grafana dashboard - CPU Usage and quota for wa-waserver instance in workload automation namespace Fig 8. Grafana dashboard - Memory Usage and Quota for wa-waserver instance in workload automation namespace Fig 9. Grafana dashboard - Network Usage and Receive bandwith for wa-waserver instance in workload automation namespace Fig 10. Grafana dashboard - Network Average Container Bandwith by pod -Received and Transmitted for wa-waserver instance in workload automation namespace Author's BIO
0 Comments
Your comment will be posted after it is approved.
Leave a Reply. |
Archives
July 2024
Categories
All
|






 RSS Feed