|
As a matter of fact, the deployment of Workload Automation (WA) to a Microsoft Azure cluster makes the implementation of the WA topology 10 times faster and 10 times more scalable compared to the same deployment to the classic on-premises platform, as is the case for Red Hat OpenShift, AWS EKS, Kubernetes and so on. The WA deployment to an Azure cluster can leverage all well-known cloud benefits. Let’s go one step further with the WA deployment in the Azure world; using a managed database mean you avoid all those annoying maintenance and administration duties related to database management such as, supervise installation, migration and upgrade of databases, identify and resolve the database issues related to performance and capacity, create and manage all disaster recovery procedures to ensure continuous availability and speedy recovery, to name a few. Deploying WA to an Azure cluster means you can take advantage of the following Azure SQL solutions:
In this blog article, we focus on the SQL Managed instances, that is, the most important solution from a customer point of view, because it enables data migration from the existing on-premises WA relational database instance to the Azure SQL instance. Azure SQL Managed Instance Service guarantees high availability for every database and it ensures the uninterrupted flow of management traffic so you can forget about managing the WA database instances because Azure can do it for you! Let’s discover how to use Azure SQL Managed Instance for a WA deployment without any need for existing basic SQL skills to get started. Take an in-depth look at what you can do, to deploy the WA solution. Deploy a WA solution in Azure with an SQL Managed Instance Perform the following 2-step procedure:
Step 1: Create Azure SQL DB instance 1. Log in to the Azure portal of your organization and type “azure SQL” in the search bar. After the Azure SQL service appears on your screen, click Add to create a new Azure SQL resource that you will use later for the Workload Automation product deployment. 2. Now you can select one of the three different Azure SQL Database instance types:
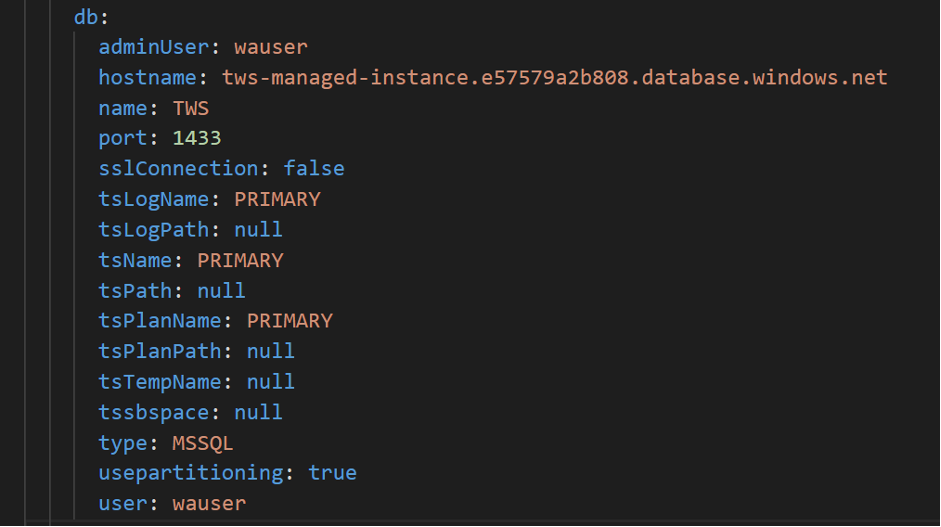
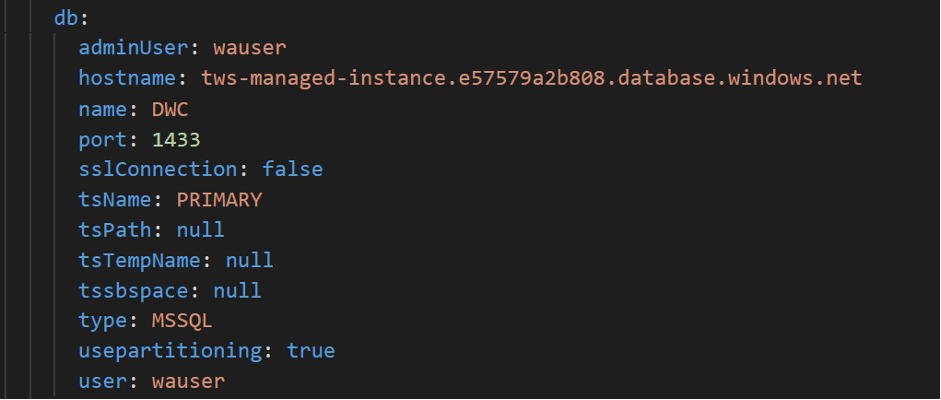
Both HCL Workload Automation and IBM Workload Automation support the use of each of these Azure SQL Database instance types. You can choose the one that best fits with your needs! In this example, we chose the SQL Managed Instance because, in our opinion, it is the most innovative and efficient solution among those offered by Azure. 3. In the SQL Managed Instance service, click Create and fill the required input parameters to initialize the “tws_managed_instance” WA database Instance. When the “tws_managed_instance” instance is created, open the definition and take note of the Host parameter value that you will need to use later to establish a connection between the Workload Automation Server and Console with the Azure SQL Database. At this point, we are ready to deploy the WA solution! Step 2: Deploy WA solution in Azure with an SQL Managed DB Instance In this example, we set up a WA environment with the use of a Load Balancer network configuration for the server and console components. For detailed information about the prerequisites, see the README file: https://github.com/WorkloadAutomation/hcl-workload-automation-chart or https://github.com/WorkloadAutomation/ibm-workload-automation-chart Once we have created a new Namespace, called hwa, for our WA environment in the Azure cluster, and we have added the WA chart to our Helm repository, the only step that separates us from having a WA environment deployed to Azure is the customization of the configurable parameters in the values.yaml file.
4. Do the same for the console component. 5. To configure the deployment with a Load Balancer network service, set the exposeServiceType as LoadBalancer and uncomment the Azure Load Balancer annotation. 6. To deploy the Workload Automation configuration saved in the values.yaml file, from the directory where the file is located, run the following command: helm install -f values.yaml hwa workload/hcl-workload-automation-prod -n hwa Now, wait about 10 minutes, take a break, and get ready to start working with the Workload Automation console, server and agent on Azure AKS. Enjoy! We hope this article is useful. It’s now your turn to try it out and then let us know. Feedback and comments are very helpful to us! Do not hesitate to reach out to us to clarify any doubts or questions! Author's BIO
0 Comments
Your comment will be posted after it is approved.
Leave a Reply. |
Archives
July 2024
Categories
All
|


 RSS Feed