|
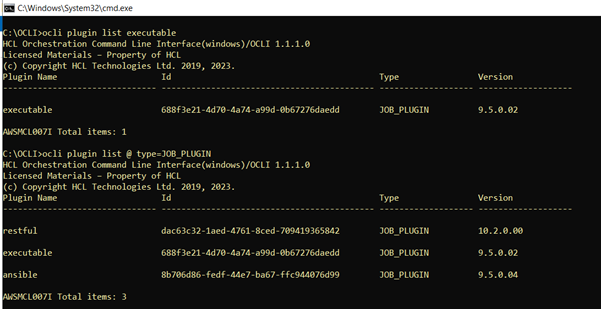
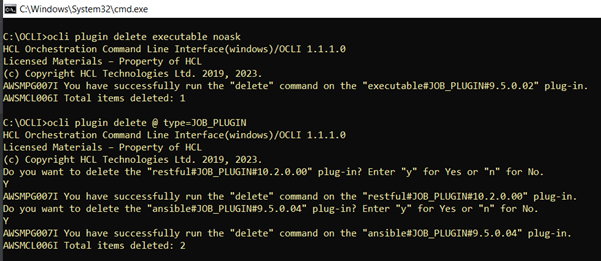
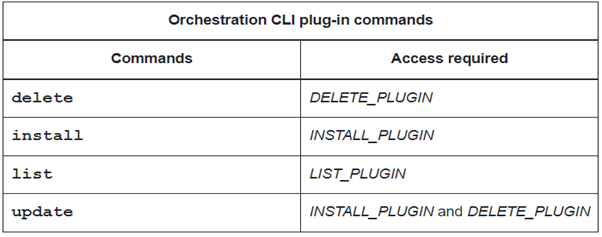
Orchestration CLI offers a unified interface for orchestrating complex workflows efficiently. One of its key functionalities includes managing plug-ins across different environments seamlessly. Users can integrate and manage all Job /Event type plug-ins available on Automations Hub with HCL Universal Orchestrator Let’s delve deeper into plug-in management using Orchestration CLI. The syntax for Orchestration CLI follows a standard format. It contains the command type (plug-in or context or plan or model) followed by the command and its related parameters. Installing single or multiple plug-ins You must have the executable files in your machine to install the plug-in. Run the command as follows to install a plug-in. Syntax: ocli plugin [install | i] filepath or folderpath If multiple plug-ins are available at the file path, running the command installs all of them. You can also install multiple versions of the same plug-in at the same time. The following figure shows the installation of a single plug-in. The following figure shows the installation of multiple plug-ins at the same time. Updating Plug-ins We additionally facilitate the downgrading and upgrading of any plugin to accommodate various security requirements as per user preferences. This command proves beneficial in instances where a plugin is corrupted or fails to function as anticipated. Updating plugins is crucial for various reasons: enhancing their functionalities, improving performance, fixing bugs or security vulnerabilities, introducing new features, and ensuring compatibility with the latest version of the software or platform they are integrated with. You can use the following command to update the plug-ins and keep them up to date. Syntax: ocli plugin [update | u ] filepath or folderpath [;noask] If you specify the optional noask parameter, the plug-in updates to the selected version by deleting the existing version, if present, without user confirmation. The following figure shows the update of an existing plug-in. Listing Plug-ins You can run the following command to list the plug-ins installed. Syntax: ocli plugin [list | l ] [plugin_name] ;[type=plugin_type] ;[version=version] There are different set of optional arguments that you can add to list the plug-ins using Orchestration CLI. The following figure shows few examples to list the plug-in by either adding the plugin_name or by using wildcards for type or version of the plug-in. Deleting Plug-ins To remove a plug-in or multiple plug-ins, you can run the following command with any one of the arguments – plugin_name or wild cards for type/version of plug-ins. Syntax: ocli plugin [delete | d] plugin_name [;type=plugin_type] [;version=plugin_verison] [;noask] The following figure shows few examples for running the delete command. When you run the command, Orchestration CLI ensures that the plug-ins associated with any job definition or a job in plan, with a state other than its final states (SUCC, FAIL, ABEND or SUPP) are not deleted. For more information, see Delete Plugin. Authorization required for running Orchestration CLI commands: Orchestration CLI requires specific permissions for running each plugin command. You can customize the level of access to run the command, and roles can be managed using DWC or Orchestration CLI. For the permissions required to run the plug-in commands, see the following figure: Orchestration CLI is a great tool to manage plug-ins. It helps developers and admins to work faster and better. With its easy-to-use interface and strong features, teams can organize the work more efficiently and can have less downtime. Start using Orchestration CLI now to enhance your plugin management!
0 Comments
Your comment will be posted after it is approved.
Leave a Reply. |
Archives
July 2024
Categories
All
|


 RSS Feed