 SAP systems include the basic security measures of SAP authorization and user authentication by password. This blog explains how to use Secure Network Connection (SNC) to extend SAP system security beyond these basic measures to include the additional protection of stronger authentication methods and encryption. This blog explains connectivity mechanisms provided by Workload Automation for SAP Software to establish a secure connection via SNC to SAP. Workload Automation does not provide or ship SNC software, it enables to use 3rd party SNC products to secure the RFC communication. 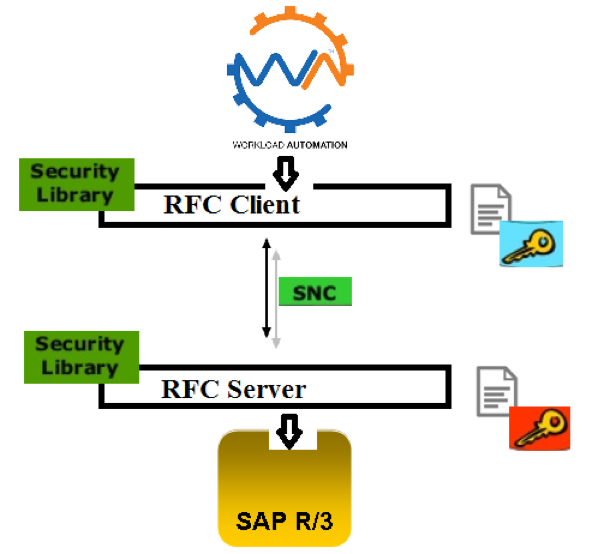 SNC is a software layer in the SAP system architecture that provides an interface to external security products. With SNC, is possible strengthen the security of your SAP system by implementing additional security functions and protections. SNC provides application-level, end-to-end security to ensure reliable, consistent, and secure connections. SNC is used to secure Remote Function Call (RFC) connections to SAP Advanced Business Application Programming (ABAP) systems. SNC support is implemented as a layer between the SAP kernel and an external security library that implements the Generic Security Services API (GSS-API). SAP also provides the SAP Cryptographic Library, which you can download from SAP. Workload Automation enables you to connect to SAP systems by establishing a secure RFC connection called as SNC. There are three levels of security protection you can apply. Authentication only: When using the Authentication only protection level, the system verifies the identity of the communication partners. This is the minimum protection level offered by SNC. Integrity protection: When using Integrity protection, the system detects any changes or manipulation of the data which may have occurred between the two end points of a communication. Privacy protection: When using Privacy protection, the system encrypts the messages being transferred to make eavesdropping useless. Privacy protection also includes integrity protection of the data. This is the maximum level of protection provided by SNC. In this document Authentication only will be considerate. Prerequisites · The SAP Cryptographic Library has been installed on the application server. · The SNC PSE has been created or installed on the application server. · If you use individual PSEs, then you have exchanged the Client and the application server’s public-key certificates. · The SNC profile parameters have been set and SNC has been activated on the application server How to configure SAP Cryptographic Library is the default SAP security product performing encryption functions in SAP systems. It meets the requirements of the GSS-API V2 Interface. Download SAP Cryptographic Library (SAP authorization required). The SAP Cryptographic Library installation package contains the following files:
When using SAP Cryptographic Library for SNC, the SAP server and its communication partner system (where the Tivoli Workload Scheduler for Application r3batch runtime is installed) must both be configured for SNC. Personal Security Environment (PSE) must be configured. It is used by both components to verify and authenticate the remote component, and to store public-private key pairs and public-key certificates. For SNC, it is better for each component to have its own individual PSE, because. In this document, individual PSEs are used by both systems. Creating and configuring server PSE is required to set SAP instance profile parameters to enable SNC and specify the SNC name. Follow the instructions below to configure PSE and activate SNC on the SAP server: Using the trust manager (transaction STRUST): Expand the node for the SNC PSE. If the PSE does not exist, then you must create it. Creating the SNC PSE: Using the trust manager (transaction STRUST): Select the SNC PSE node. Using the context menu, choose Create (if no PSE exists) or Replace. The <Create/Replace> PSE dialog appears. If the server's SNC name is defined in the profile parameter snc/identity/as, then the system automatically determines the Distinguished Name accordingly. Otherwise, enter the Distinguished Name parts in the corresponding fields, for example: Name = <SID> Org. (opt.) = Test Comp./Org. = MyCompany Country = US Note: If you want to use a reference to a CA name space, then the elements contained in the CA field are automatically used for the server's Distinguished Name. In addition, you cannot modify the Country field. Use the toggle function (This graphic is explained in the accompanying text) to activate or deactivate the reference to a CA name space. Note: In addition, the application server's Distinguished Name to use for SNC must be unique. You cannot specify a Distinguished Name that the server uses in a different PSE, for example, the system PSE. Choose Enter. You return to the Trust Manager screen. For SNC, you must assign a password to the PSE. Choose This graphic is explained in the accompanying text Assign password. The PSE dialog appears. Enter a password for the PSE and choose Enter. You return to the Trust Manager screen. The system creates the SNC PSE and distributes it to the individual application servers. The system protects the PSE with a password and creates credentials for the server so that it can access the PSE at run-time. Using individual PSEs, then the next step is to exchange the servers’ public-key certificates. Green lights indicate that the SNC PSE exists and has been distributed to the application server instances. Select one of the instances with a double-click. The server’s Distinguished Name to use with this PSE appears in the Own certif. field. Unless you receive errors during this procedure, the SNC PSE exists on the application server and is accessible at run-time. 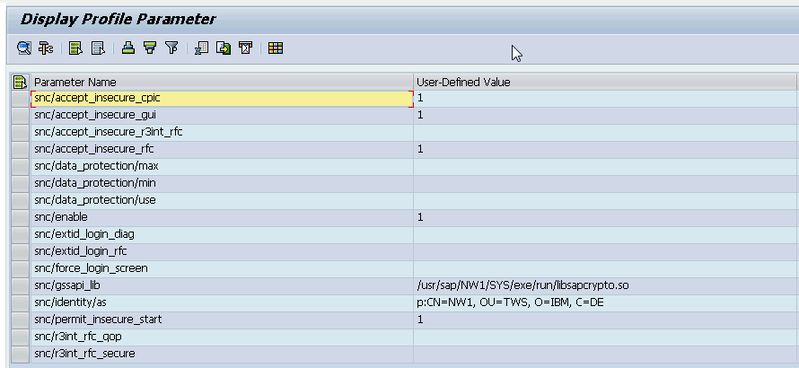 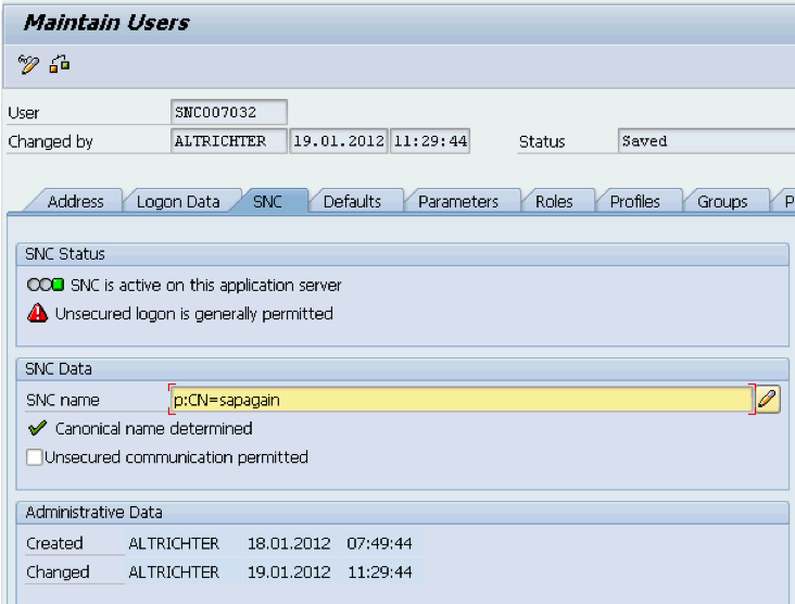 How to configure Workload Automation The client system in this case is the machine where Workload Automation, r3batch, is deployed. You need to do a one-time setup process of creating a PSE on the client and creating and exchanging cryptographic key material. Set the environment variables SECUDIR. For example: SECUDIR=C:\newsnc SECUDIR contains the license ticket obtained previously and contains the sapcrypto.dll and sapgenpse.exe file. Create a PSE using sapgenpse.exe: sapgenpse gen_pse -v -p PSE_FILE_NAME. You will be asked to set a PIN, which serves as the PSE password. Then you need to enter distinguished name for the PSE owner. 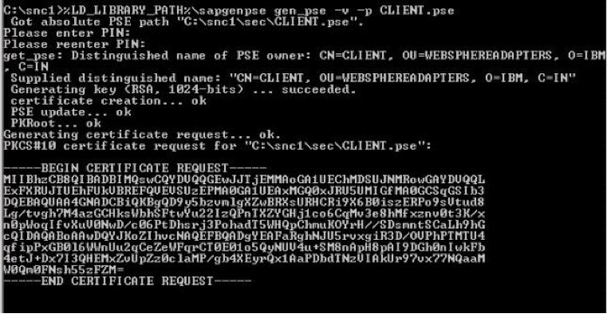 Configure the PSE and create a credentials file named cred_v2 for the user. It lets client applications access the key store. This file is usable only for the current operating system user: sapgenpse seclogin -p PSE_FILE_NAME -O USERNAME. 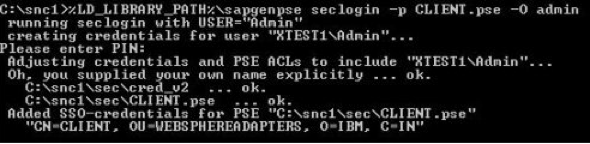 The SAP ABAP system and the client need to exchange the certificates in order to trust each other and communicate securely. Export the client certificate from PSE using the following command: sapgenpse export_own_cert -v -p PSE_FILE_NAME -o CLIENT_CERT_NAME.  Go to configured PSE on the SAP server and import the client certificate into SAP using the SAP transaction code STRUST. Then use Import Certificate to select the certificate exported in the above step and add it to the certificate list. 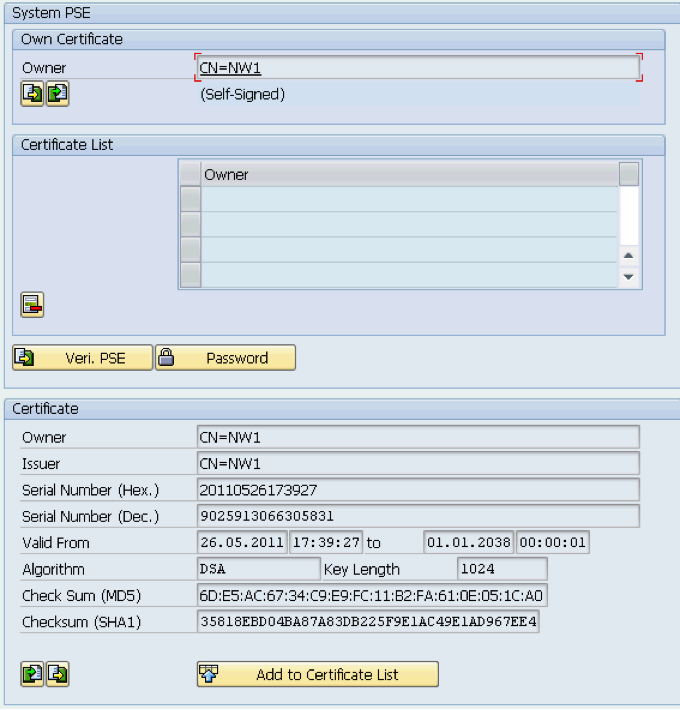 Export the SAP certificate from the server: Select the server certificate and click Export: Import the SAP certificate into the client PSE using the following command: sapgenpse maintain_pk -v -a SERVER_CERT_NAME -p PSE_FILE_NAME SNC has an access control list, so you need to create an entry for your client for the SAP system to allow SNC connection for RFC. On SAP, go to Transaction SM30, enter VSNCSYSACL and click Maintain. Then click “The table is cross-client information”. 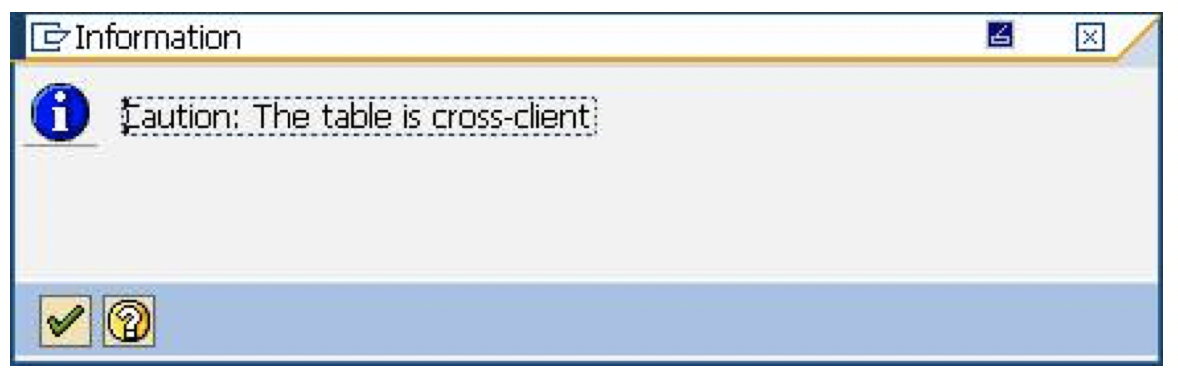 Choose "E" for the type of Type of ACL entry:  Enter System ID and SNC name. Don't forget the "p:" Do not forget to save this entry. You are now done with SNC configuration on both the client and server sides SNC Keywords for Parameterization
For examples in cpu_r3batch.opts file: ----------------------------------------------------------------------------------------- r3host=/H/9.153.165.9/H/9.153.165.227 r3client=001 r3SID=NW1 r3sncmode=1 r3sncqop=3 r3sncmyname=p:CN=sapagain r3snclib=C:\newsnc\sapcrypto.dll r3sncpartnername=p:CN=NW1, OU=TWS, O=IBM, C=DE ----------------------------------------------------------------------------------------- From r3batch trace file here it is the connection string <Server Format="IP">nc007032</Server> <ProductId>TWS4APPS</ProductId> <Component>R3BATCH</Component> <LogText><![CDATA[SNC logon string=[CLIENT=001 LANG=EN ASHOST=/H/9.153.165.9/H/9.153.165.227 SYSNR=00 LCHECK=1 TRACE=0 ABAP_DEBUG=0 SNC_PARTNERNAME="p:CN=NW1, OU=TWS, O=IBM, C=DE" SNC_LIB="C:\newsnc\sapcrypto.dll" SNC_MODE=1 SNC_QOP=3 SNC_MYNAME="p:CN=sapagain"].]]></LogText> <LogAttribs><Key>organization</Key><Value>IBM</Value></LogAttribs> <Source FileName="../../src/r3batch/rfc_open.c" Method="rfc_open" Line="297"/> <Thread>4804</Thread> <Process>5716</Process> Author's Bio
0 Comments
Your comment will be posted after it is approved.
Leave a Reply. |
Archives
July 2024
Categories
All
|


 RSS Feed