 Do you use ServiceNow to manage your business workflow? If so, this integration is for you: it allows different actions to be performed from a single endpoint. The supported actions are:
Creating a ServiceNow Job To enhance your digital workflow, download the ServiceNow plugin (LINK TBD) directly from Automation Hub . After this, you can start to define a job and will find ServiceNow under a category named “Human Tasks”. 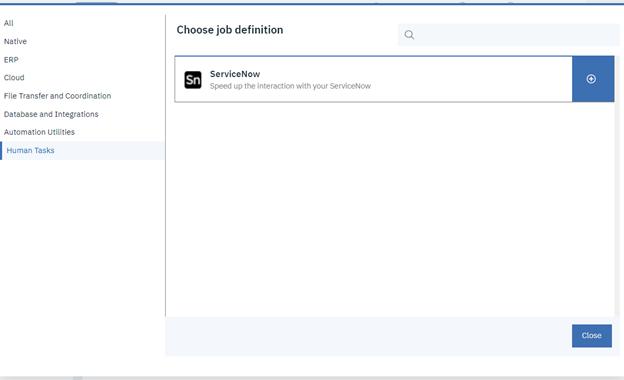 Figure 1: ServiceNow category on DWC (Dynamic Workload Console) Connection Your ServiceNow instance name (for example, : https://dev12345.service-now.com/ => name: dev12345) as the host, as well as the credentials for that instance, are required for the connection's initial step. A second option is to authenticate using an OAuth token (shown in the second image); for this method of authentication, the field OAuth User is only necessary if the chosen password type is User or Agent User. To prevent unexpected failures during runtime, it is advised (but not necessary, for storing and submitting the job) to click the "Test connection" button.  Figure 2: Basic Authentication 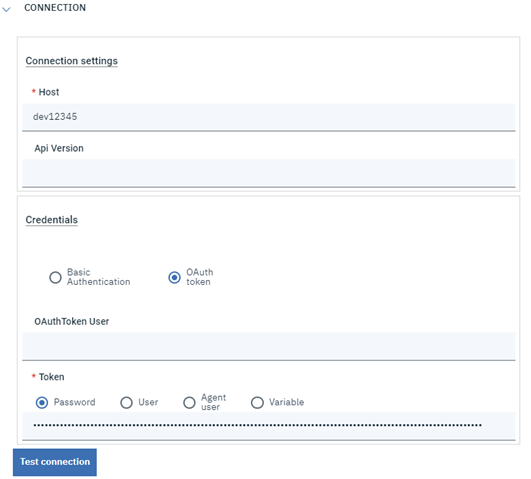 Figure 3: OAuth authentication Action In the action tab, it will be possible for the user to choose which action to perform (Create, Monitor, Update) via radio buttons; the further action Create and Monitor can be performed by checking a checkbox inside the Create action, instead. A useful feature of this tab (common to all the actions) is the validation. It is, in fact, recommended to validate the fields before the saving, especially if one is not certain about the values inserted in each field and whether they are valid. The button “Validate input” goes through all the user filled fields and checks whether there are any discrepancies with respect to what is expected. If discrepancies are found, an error message is given to the user, indicating what needs to be changed. It is also important to know, that to use any of the buttons present in the plugin, the test connection must be performed. Create If the desired action is “create”, it is mandatory to insert the table name (e.g. the type record to be created). Since the tasks you can create depend on how your instance is configured the “Search” button will help by giving a list of the available tables. 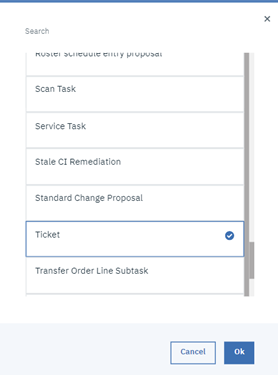 Figure 4: Search button provides the list of available tables Once the table is selected, the user must fill the mandatory fields in the context of that table. This can be done, by clicking on the “+” button. An example of create with filled fields is provided (see Figure below)  Figure 5: Creation of a task (a ticket in this example) Alternatively, if you do not know what the mandatory fields are, the “Get fields” button will help by providing a list of all the fields, with the mandatory fields (if any) selected by default. 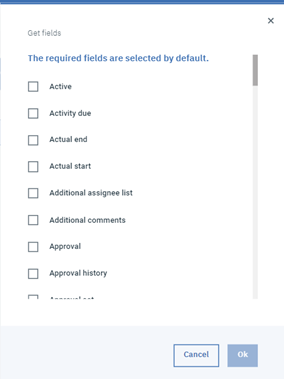 Figure 6: example of “Get Fields” button’s result. Important information There are few crucial details to keep in mind about the create action:
To perform the monitoring of a task, the the “monitor” radio button must be selected. After that, the id (or the name) of the task to monitor must be specified alongside with the state to monitor which can be an approval and/or rejection state. In fact, the user has the possibility to insert the approval state and/or the rejection state that the previously specified task must reach for the monitor to finish. If both are inserted, the monitoring will end as soon as either one is reached. None of the two states is required but at least one must be filled. In case the user is unsure on what the correct values for states are, the “Get state” button will help by giving a list of the available states. 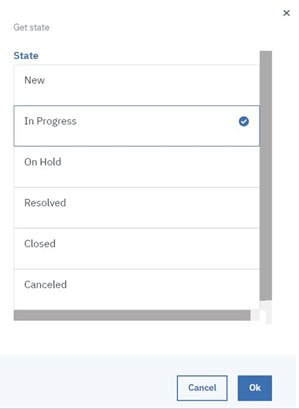 Figure 7: Example of "Get State" button’s result. Note that multiple states can be inserted, and, in this case, when any one of the states is reached, the monitor finishes. Other fields available are the polling interval and polling timeout; if skipped, default values of 30 seconds and 1 day will be assigned, respectively. On the other hand, upon user’s input, the values are reassigned as desired. An example of monitoring is shown below: 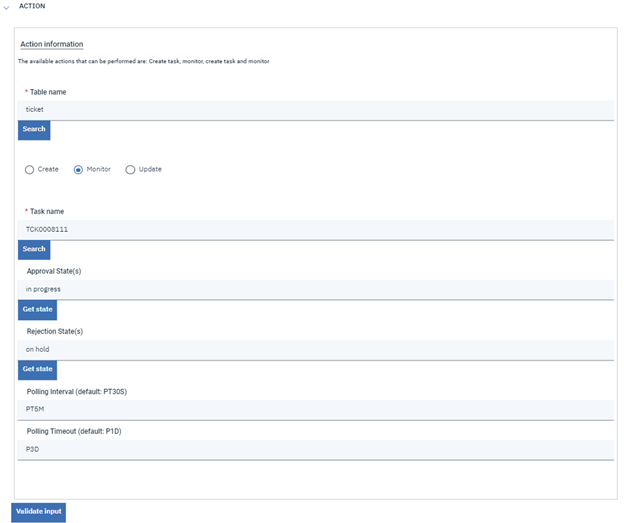 Figure 8: Monitor example In the above image, the polling interval and polling timeout will not be the default ones, rather they will correspond to 5 minutes and 3 days, respectively. Even though the accepted format for the aforementioned fields is the one shown in the picture, the user is also allowed to simply write “10s”,”10m” or “1d” as they will be automatically converted into the right format. Create and Monitor Furthermore, if you want to keep an eye on the ticket you have to create, you perform the creation and monitoring of a task, for which you have to select the “create and monitor” checkbox that is under the “Create” action. The creation can then proceed as described in the Create paragraph, and the monitoring works as described in the Monitor paragraph. An example of create and monitor is shown below: 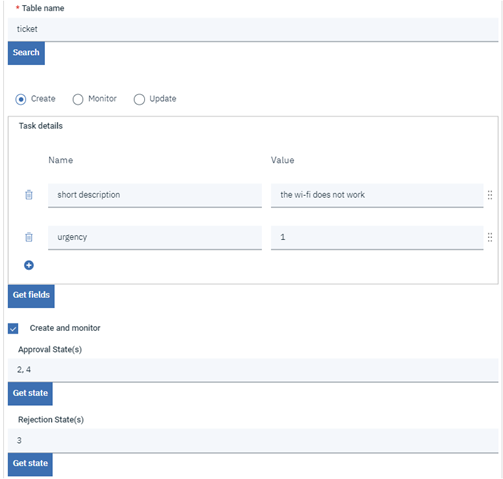 Figure 9: Create and Monitor example As you can see, the states in this example are inserted as numbers, whereas in Figure 8 they are inserted as strings: this is because both formats are allowed. You can also mix them up by writing “2, resolved” or “on hold, 7” (which are four different states). Of course, these values have to be coherent to the instance you are using. Update An update functionality is also available in case you need it. First, you select the “update” radio button. Then, insert the id (or the name) of the task to update and the fields you want to update inside the task. This can be done by clicking on the “+” button. An example of update can be seen in the following image: 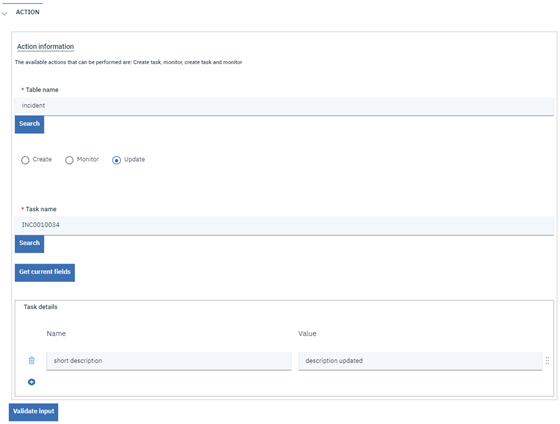 Figure 10: Update example NOTE: to delete the value of a previously filled field and leave it empty, the string “unset” must be inserted as field value. Moreover, it is important to remember that through this operation all the values inserted will replace the previous values (if any are present). For instance, it is not possible to add a value to one that is already inserted: in this case both (or all) desired field values need to be inserted. Moreover, the user can click on the “Get current fields” button to see the list of all the fields (and their values) corresponding to that task (an example is shown below). 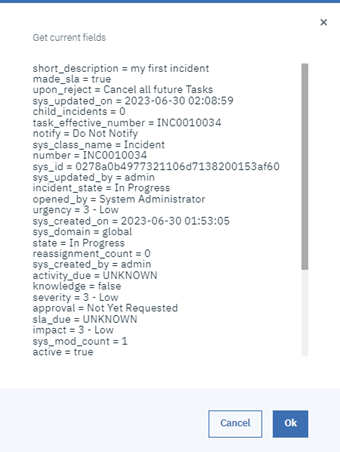 Figure 11: Example of "Get current fields" button's result. Stability This integration is ready to resist unexpected events that can happen occasionally. In fact, if you are performing any of the available actions and your server goes down, reconnecting will be the first thing that the plugin will do when the server is up again. Reconnect The reconnect functionality during checks the job properties. Particularly, for what concerns Create and Create and monitor action the task id is checked and if it is not found the action is executed from scratch. For what concerns the monitoring, the reconnect functionality checks the task state, the polling interval, and the polling timeout: if the timeout was not reached and the task state does not match any of the required ones, the polling resumes from when it stopped. When the server goes down during update, the reconnect checks a property that indicates whether the update was successful or not. Author
Co-Author
0 Comments
Your comment will be posted after it is approved.
Leave a Reply. |
Archives
July 2024
Categories
All
|


 RSS Feed