 If you want to avoid a potential business disruption in your Workload Automation environment, you should leverage the Master/Backup Master configuration. But, what happens if the RDBMS connected to Workload Automation crashes? In this article, we will describe how to manage both Workload Automation components and DB2 HADR to allow business continuity during a disaster event. Scenario To avoid possible disasters in a Workload Automation production environment, you must configure your environment in high availability. In Figure 1., you see a Workload Automation environment with both Master and Backup Master configured with DB2 HADR. 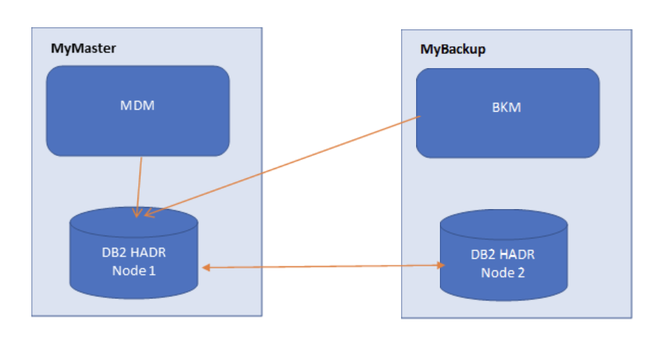 In following sections, we will describe:
How to set up DB2 HADR for Workload Automation This configuration is composed of two nodes (MyMaster and MyBackup) on which are installed all Workload Automation components (MDM on MyMaster and BKM on MyBackup) with their own DB2 nodes configured in HADR. The DB2 HADR is composed of two nodes, one is the primary node that is active and a secondary node that is in standby mode synchronizing data with the primary node. DB2 HADR configuration To configure the Workload Automation database in HADR we’ve to setup DB2 as below on both nodes. In the following commands, TWS is the database name. Setup database properties: 1. The first configuration is about DB alternate server name and port, on both nodes: db2 update alternate server for database TWS using hostname <other machine> port <db_port> 2. Now we’ve to set all DB HADR properties on both nodes: db2 update db cfg for TWS using HADR_LOCAL_HOST <mymaster|mybackup> This parameter specifies the hostname of the local database db2 update db cfg for TWS using HADR_REMOTE_HOST <mymaster|mybackup> This parameter specifies the hostname of the remote database db2 update db cfg for TWS using HADR_LOCAL_SVC <local service name> This parameter specifies the local DB2 service name db2 update db cfg for TWS using HADR_REMOTE_SVC <remote service name> This parameter specifies the remote DB2 service name db2 update db cfg for TWS using HADR_REMOTE_INST <remote instance name> This parameter specifies the remote instance name db2 update db cfg for TWS using HADR_TIMEOUT <peer timeout> This parameter specifies how after much time DB2 will consider a node as offline db2 update db cfg for TWS using HADR_TARGET_LIST <peer nodes list> This parameter specifies the list of HADR nodes to lookup db2 update db cfg for TWS using HADR_SYNCMODE <sync mode> This parameter specifies the transaction logs synch mode. This parameter should set depending on various factors like network speed between nodes. To refer to the IBM Info Center for the detailed explanation, please click here: https://www.ibm.com/support/knowledgecenter/SSEPGG_9.5.0/com.ibm.db2.luw.admin.config.doc/doc/r0011445.html db2 update db cfg for TWS using HADR_REPLAY_DELAY <delay limit> This parameter specifies the number of seconds that must pass from the time that a transaction is committed on the primary database to the time that the transaction is committed on the standby database. Start HADR on both nodes Now that HADR is configured, we have to start it using a fixed order: first the standby node and then the primary one: On MyBackup issue the following command: db2 start hadr on db TWS as standby On MyMaster issue the following command: db2 start hadr on db TWS as primary How to configure WebSphere Liberty to manage DB2 HADR After configured DB2 in HADR, we have to configure the TWS datasource of Liberty in order to point to HADR instead of single DB node. So, Liberty, also if doesn’t know where DB is physically active, is able to reach TWS database. To configure TWS datasource properties edit the file <TWA_HOME>/<DATADIR>/usr/servers/engineServer/configDropins/overrides/datasource.xml:
serverName="MyMaster" portNumber="50003" databaseName="TWS" user="db2inst1" password="="{xor}xxxxxxxxxxxxxxxxxx” clientRerouteAlternateServerName="MyBackup" clientRerouteAlternatePortNumber="50003" retryIntervalForClientReroute="3000" maxRetriesForClientReroute="100" />
<server description="datasourceDefDB2"> <variable name="db.driverType" value="4"/> <variable name="db.serverName" value="MyMaster"/> <variable name="db.portNumber" value="50003"/> <variable name="db.databaseName" value="TWS"/> <variable name="db.user" value="db2inst1"/> <variable name="db.password" value="{xor}xxxxxxxxxxxxxxxxxx"/> <variable name="db.driver.path" value="/opt/wa/TWS/jdbcdrivers/db2"/> <variable name="db.sslConnection" value="true"/> <variable name="db.clientRerouteAlternateServerName" value="MyBackup"/> <variable name="db.clientRerouteAlternatePortNumber" value="50003"/> <variable name="db.retryIntervalForClientReroute" value="3000"/> <variable name="db.maxRetriesForClientReroute" value="100"/> <jndiEntry value="DB2" jndiName="db.type" /> <jndiEntry value="jdbc:db2://${db.serverName}:${db.portNumber}/${db.databaseName}" jndiName="db.url"/> <jndiEntry value="${db.user}" jndiName="db.user"/> <!-- DB2 DRIVER jars Path -> db2jcc4.jar db2jcc_license_cisu.jar --> <library id="DBDriverLibs"> <fileset dir="${db.driver.path}" includes="*" scanInterval="5s"/> </library> <dataSource id="db2" jndiName="jdbc/twsdb" statementCacheSize="400" isolationLevel="TRANSACTION_READ_COMMITTED"> <jdbcDriver libraryRef="DBDriverLibs"/> <connectionManager connectionTimeout="180s" maxPoolSize="300" minPoolSize="0" reapTime="180s" purgePolicy="EntirePool"/> <properties.db2.jcc driverType="${db.driverType}" serverName="${db.serverName}" portNumber="${db.portNumber}" sslConnection="${db.sslConnection}" databaseName="${db.databaseName}" user="${db.user}" password="${db.password}" clientRerouteAlternateServerName="${db.clientRerouteAlternateServerName}"clientRerouteAlternatePortNumber="${db.clientRerouteAlternatePortNumber}" retryIntervalForClientReroute="${db.retryIntervalForClientReroute}" maxRetriesForClientReroute="${db.maxRetriesForClientReroute}" /> </dataSource> </server> How to recover from disaster To recover from a disaster scenario, for example if the primary node crashes, we can leverage multi node environment to allow business continuity. Follow these steps to recover the Workload Automation environment. Takeover database on standby node We’ve to “takeover” the database on the secondary node. On MyBackup issue the following command: db2 takeover hadr on db TWS Switch Workload Automation components After the database switch to secondary node we have to switch also all Workload Automation components.
where S_MDM is the backup master workstation.
where S_BKM is the backup master workstation.
sed 's/fta/MANAGER/Ig' < file2 > file4
<TWA_HOME>/wastools/stopBrokerApplication.sh On backup master node: <TWA_HOME>/wastools/startBrokerApplication.sh
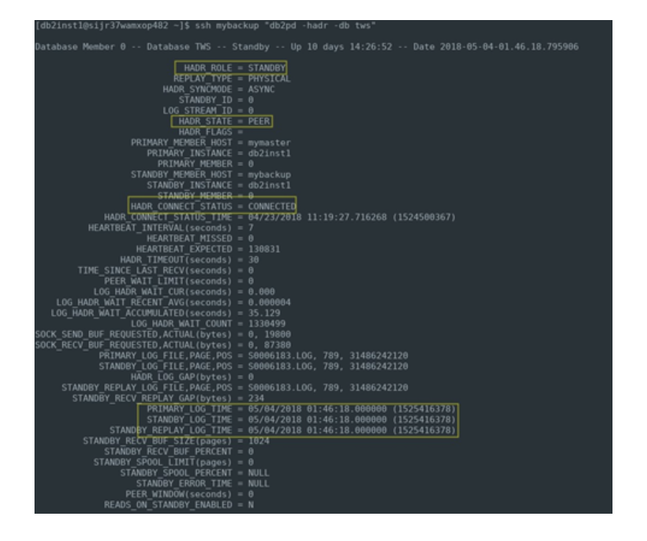
composer replace file4 Now both middleware and Workload Automation components are on MyBackup machine and we could continue to work on this secondary node without any disruption. 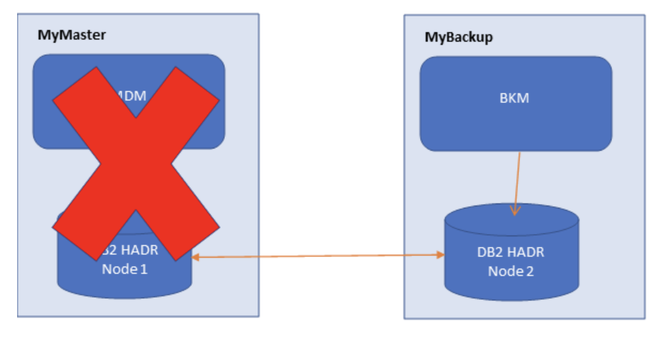 Troubleshooting How to check HADR health To check the HADR status issue the following command on both nodes: db2pd –hadr –db TWS where TWS is the database name. Here an example of output of the command on the primary node: 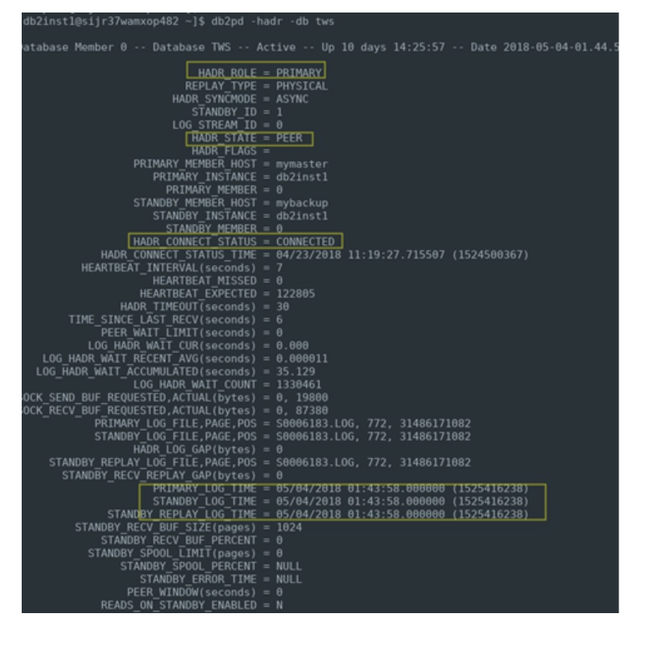 This picture shows the status of HADR on primary node: highlighted parameters are the ones that describes the HADR healthy:
 How to fix HADR issues If one of parameters described in the previous section is not in expected state, it means that HADR is not working fine and immediate action should be performed. Let try to understand common errors and recovery actions that should be performed. First try to start HADR on the node that is not working fine: db2 start hadr on db TWS as standby|primary If after some minutes the wrong status does not change it means that HADR is broken. Probably the node on which HADR is not working has either database corruption or a missing/corrupt transaction log, so the strategy to recover is: 1. Takeover HADR on the working node: db2 takeover hadr on db TWS 2. Backup online the database on the working node: mkdir /tmp/TWS_backup db2 "backup db TWS ONLINE to /tmp/TWS_backup INCLUDE LOGS" 3. Copy the TWS_backup on the corrupted node 4. Drop and Restore the database on the corrupted node: db2 drop db TWS db2 "restore db TWS from /tmp/TWS_backup " 5. Reconfigure and start HADR on the working node (for example MyBackup): db2 "update alternate server for db TWS using hostname MyMaster port 50003" db2 "update db cfg for TWS using HADR_LOCAL_HOST MyBackup" db2 "update db cfg for TWS using HADR_REMOTE_HOST MyMaster" db2 "update db cfg for TWS using HADR_TARGET_LIST MyMaster:DB2_HADR_TWS" db2 "start hadr on db TWS as standby" 6. Takeover HADR on the corrupted node (in our example MyMaster): db2 takeover hadr on db MyMaster Conclusion This article provides a simple way to add a high availability capability to your Workload Automation environment to avoid possible disasters both on middleware or database side. Do not hesitate to contact us for any questions. References If your Workload Automation version is a 9.4 or previous, you can refer to this post: http://www.workloadautomation-community.com/blogs/workload-automation-how-to-survive-disasters# Author's BIO
0 Comments
Your comment will be posted after it is approved.
Leave a Reply. |
Archives
July 2024
Categories
All
|


 RSS Feed